|
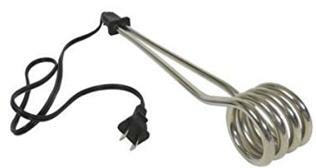
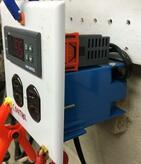
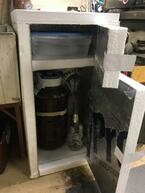
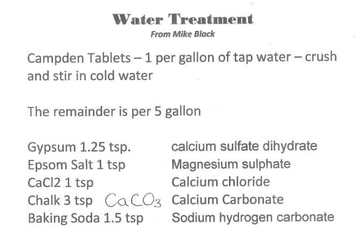
by Dave Harding A bit more than two years ago my experienced brewer grandson gave me a Northern Brewer kit. We brewed the first batch on “my wife’s” kitchen stove and made a mess, so that was out for future brews. So found a way to turn one of my basement workshops into my brewery. In the early days I routinely did gas welding there, but over the years I have accumulated a good deal of flammable materials, so I am no longer comfortable using open flames. So gas powered brewing was out of the question. A while back we decided to move the laundry upstairs so I was able to add that space as another workshop. This one has a big laundry tub still intact. Also when I remodeled it into the workshop I removed the 220 volt service but added several 20 Amp 110 volt lines for the power tools. This is now my brewery. I have developed a way to brew with two separate 1350 watt immersion heaters with one on a digital temperature controller; it works great and I have done almost forty 5 gallon brews, and found it to be almost as quick as the propane approach. The last brew from start to a sealed fermenter took about 2 ½ hours. Here is the process Member Mike Black gave me the water treatment formula from an earlier club lecture; (Table below). Since I have Chester Water the source is from the Octoraro Watershed and this is the base for which the lecturer provided the desired treatment. Don’t know his objective treated water so I hope we get the lecturer to return again this year and maybe we will learn how to produce a variety of brew waters appropriate to the beer style we are brewing. My method is to fill the brew kettle with 2 ½ gallons and two one gallon milk jugs of water for the final addition. I put the chemicals into one of the jugs and half fill it with water. Once mixed I put half into the brew kettle then share the remainder with the other milk bottle. Both bottles are then filled and, particularly in the summer when the domestic cold water is warmer, I put them in the refrigerator. This allows me to cut off the wort cooling at a higher temperature but still allow the final wort to be at the ideal fermenting temperature.  Building the Electric Brewing System If you wish to try electric heating you will find it quite inexpensive but there are a few important things to know. The $14 1350 watt 110 volt immersion heaters I use were bought from Amazon. There are two key attributes for this unit, it is 13 inches long so reaches from the rim to the bottom of the brew kettle and the second is the plastic end is molded and sealed around the heating elements. Make ABSOLUTELY sure the one you buy does not have a bolted end like the one on the right. I tried one and found if wort is splashed into the joint you will get a surprising flash and popped circuit breaker! These 1350 watt 110 volt units will work fine on a normal house circuit, but two of them on the same circuit will cause an overload and pop the circuit breaker. So simply connect them to two different circuits; you may have to use an extension cord for one of them. For temperature measurement and control I have set up a daughter outlet with a controller that can be plugged into a normal circuit. The controller is an Ink Bird unit also available from Amazon for $16.  It can control heating or cooling. Of course in addition to controlling the brewing process it can control a fermenting heating blanket to match the yeast best temperature setting. I mounted mine on an outlet box then connected the wires with an extension cord input then output wired to the output sockets. The arrangement is shown on the right and the wiring diagram comes with the unit.  I also used the controller to lager my Bombing Run Lager. Not having a refrigerator in my brewery, and not planning to brew a lot of lager I made an ice box with an upper station for ice and lower chamber to lager the brew. A computer fan connected upper to lower and was controlled by the controller to keep the lower chamber at the right temperature. So why not give it a try, ask me to help. Comments are closed.
|
